

Setting up the 1X NEO Gamma at home takes about 1–1.5 hours: unbox and inspect, charge the integral battery to full (4‑hour runtime), connect the robot to your home WiFi via the 1X companion app, then run the onboard calibration. You need at least 2.5 m × 2.5 m of clear, non‑slip floor and an emergency‑stop button easily within reach before the first power‑on.
What You’ll Need: Tools, Space & Time
Tools & Supplies
- 1X NEO Gamma robot (pre‑ordered; deliveries starting 2026) – full specs on BotMarket
- Provided charging cable / power adapter
- Smartphone or tablet with the 1X companion app (iOS / Android, link available via 1X’s official site)
- Stable home WiFi network (2.4 GHz or 5 GHz)
- Ethernet cable (optional, if your unit includes a RJ‑45 port – confirm with your delivery documentation)
- Anti‑fatigue rubber mat or other non‑slip floor covering
- Safety mirror (optional but recommended for monitoring the robot’s surroundings)
- Suspension stand or secure support for the first boot (NEO Gamma is bipedal and may require assistance during initial calibration)
Space Requirements
| Parameter | Minimum | Recommended |
|---|---|---|
| Floor area | 2.5 m × 2.5 m clear | 3 m × 3 m or more |
| Ceiling height | 2.0 m (NEO Gamma is 1.67 m tall) | 2.2 m+ |
| Floor surface | Hard, level, non‑slip (wood, tile, low‑pile carpet) | Anti‑fatigue mat section in center |
| Exclusion zone | 1 m around the robot during first movements | Full‑time marked zone with tape or cones |
Estimated Setup Time (per phase)
| Phase | Task | Time |
|---|---|---|
| 1 | Unboxing & inspection | 15 min |
| 2 | Battery charging (initial full charge) | up to 2 hours (occurs in background) |
| 3 | Network configuration & app binding | 15–20 min |
| 4 | Firmware update | 10–20 min |
| 5 | Calibration & first walk | 20–30 min |
| Total active setup | (excluding charging) | 1–1.5 hours |
Before You Start: Safety & Space Requirements
[CRITICAL] Read this before powering on
- Exclusion zone: Mark a 1 m‑radius circle around the robot. Keep children, pets, and fragile objects outside this zone during all movements.
- Emergency stop: Identify the physical e‑stop button (likely on the robot’s back or power supply) and test it once the robot is powered. If using the app, confirm the software emergency stop works as well.
- Suspension / support: The NEO Gamma is a bipedal robot. Until calibration completes, it may not stand unassisted. Use the included support stand or have a second person gently steady it during the first stand‑up.
- Floor surface: Do not test walking on thick carpet, uneven surfaces, or floors with loose edges until after successful indoor‑flat calibration – tripping or falling may cause damage.
- Fire & gas: The robot contains a lithium‑ion battery. Do not operate near open flames or in explosive atmospheres.
Step 1 — Unboxing & Physical Inspection
- Place the shipping crate in your pre‑cleared floor area.
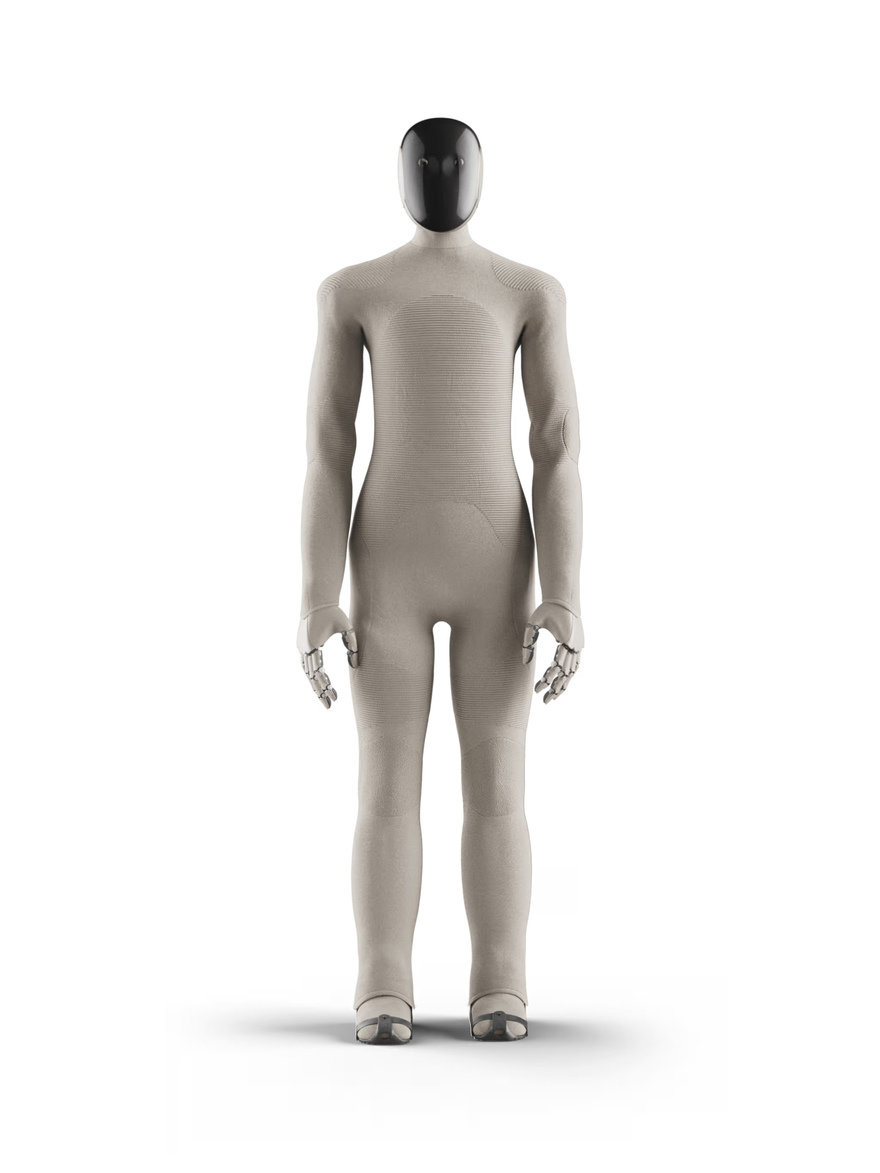
- Open the crate and carefully slide out the robot. NEO Gamma weighs about 30 kg – two‑person lift recommended.
- Check for transit damage:
- Inspect limbs, joints, and the sensor head for cracks or scratches.
- Verify all protective foam / packaging is removed.
- Inventory the accessories against the included checklist: charger, Quick‑Start card, possibly a support stand or a magnetic e‑stop dongle.
- If anything is missing or damaged, contact 1X support immediately – do not power on.
Step 2 — Battery Installation & Charging
The NEO Gamma has an internal, non‑removable (or tool‑free accessible) battery. Your unit will likely arrive partially charged.
- Connect the supplied charger to the robot’s charging port (location: check the Quick‑Start card – often on the lower back or hip).
- Plug into a grounded outlet. A full charge from empty takes about 1.5–2 hours; from a partial charge, less.
- The status LED near the charging port will pulse orange while charging and turn solid green (or off) when complete.
- Battery autonomy: fully charged, you can expect up to 4 hours of light activity, roughly 2 hours of continuous walking.
> Tip: The first charge should be uninterrupted. Avoid “short cycling” during the initial calibration procedure – keep the robot plugged in until you proceed to Step 3.
Step 3 — Powering On & First Boot
- Secure the robot on its support stand or have a helper hold it steady.
- Locate the power button (likely a recessed button on the back, near the charging port).
- Press and hold for 3–5 seconds until the boot‑up chime sounds and the main status LED transitions from off → blue → green.
- The robot will run a self‑test:
- Joint motors whirr softly.
- The head camera/LED array cycles.
- After approximately 30–60 seconds, the robot will enter “ready” mode – it remains limp/soft (passive) until you instruct it to stand via the app.
- Do not attempt to manually force the robot to stand; the calibration routine in Step 8 handles that.
Step 4 — Network Configuration (WiFi vs Ethernet)
The NEO Gamma connects to your local network for app‑based control, telemetry, and firmware updates. 1X currently recommends WiFi for initial home setup; some developer units may include an Ethernet adapter.
| Feature | WiFi | Ethernet (if available) |
|---|---|---|
| Ease of setup | Automatic via app – just select your SSID | Requires direct cable to router/switch |
| Bandwidth | Sufficient for control & telemetry | Potentially lower latency for high‑rate data |
| Physical tether | None (battery‑powered mobility retained) | Robot is tethered during use |
| Recommended for | Everyday home use, first‑time setup | Developer streaming, large log transfers |
Setting up WiFi: 1. Open the 1X companion app on your phone and follow the onboarding wizard. 2. The app will scan for the robot’s temporary hotspot (named something like NEO‑XXXX). Connect to it. 3. Enter your home WiFi SSID and password. The robot will reboot and join your network. 4. After successful connection, the robot appears in the app’s device list with a green dot.
> No static IP needed for typical consumer use – the router’s DHCP suffices. For advanced setups, reserve an IP in your router for the robot’s MAC address once it’s connected.
Step 5 — App / Remote Control Binding
The companion app serves as your primary remote control, safety monitor, and setup wizard.
- After WiFi is connected (Step 4), the app prompts you to bind the robot to your account.
- Follow the on‑screen instructions: you may need to scan a QR code on the robot’s display or enter the unit’s serial number.
- Once bound, you can:
- Teleoperate walking with on‑screen joysticks.
- Trigger sit, stand, and emergency stop.
- View battery, temperature, and joint status.
- Optionally, you may pair a physical Bluetooth gamepad for more precise control – check the app’s “Controller” menu.
Step 6 — Firmware Update & Security Hardening
Firmware update: The robot checks for new firmware automatically upon first network connection. If an update is available, the app will prompt you.
- Ensure the robot is fully charged or still plugged into the charger.
- Tap “Update” in the app. The process takes about 10–20 minutes. The robot may reboot twice.
- Do not interrupt the update (keep charger connected and network stable).
Because firmware version numbering is not yet publicly documented, always rely on the companion app to show the latest version. Check 1X’s official support portal for version‑specific release notes.
Security hardening (general best practices): - Disable Bluetooth / secondary radios when not actively using the app – reduces the wireless attack surface. - Use a strong, unique WiFi password and WPA2/WPA3 encryption. - Network segmentation: consider placing the robot on a guest or IoT VLAN, separate from your primary computers. - Disable cloud telemetry if you do not want off‑site data sharing (available in the app’s privacy settings). - Physical e‑stop security: keep the robot in a locked, inaccessible area when you are away.
> Note: The NEO Gamma is not affected by the UniPwn vulnerability (CVE‑2025‑35027) that targets certain Unitree models. Still, treat the robot as a connected device and disable any unused services.
Step 7 — SDK / ROS2 Setup (Advanced)
1X offers a developer program for NEO Gamma, with details shared upon delivery to pre‑order customers. Publicly available information is limited, but here is what we know:
- OS: The robot’s onboard computer likely runs a custom Linux distribution (possibly Yocto‑based or Ubuntu derivative).
- ROS / ROS2: 1X has historically released ROS packages for their earlier EVE robot. The NEO Gamma developer SDK may include ROS2 nodes for:
- Joint state control
- Camera / LiDAR data streams
- Autonomous navigation (mapping)
- Access method: Developers can SSH into the robot after enabling the developer mode in the app. Credentials are provided by 1X.
- Installation: Wait for official documentation. In the meantime, you can explore 1X’s GitHub organization and join the 1X developer Discord (link available via your pre‑order confirmation).
> Important: The “Advanced” success tier assumes you have access to the SDK. If you only need the robot to perform daily home tasks, you do not need to dive into this step.
Step 8 — Calibration & First Movement
Calibration aligns all 25 degrees of freedom so the robot walks smoothly.
- Position: Place the robot on the center of your non‑slip mat, with the support stand still attached or with a helper holding it.
- Initiate calibration via the app: navigate to “Settings” → “Calibration” → “Start Full Calibration”.
- The robot will slowly move each joint through its range of motion. This takes about 10 minutes.
- After completion, the app will show “Calibration Passed”.
- First stand: Remove the support stand and, from a safe distance and solely via the app, tap “Stand”. The robot should smoothly rise to its full 1.67 m height.
- If it rises without falling or oscillating, calibration succeeded.
- First walk: Use the app’s joystick to command a slow forward walk (≤ 0.5 km/h) for 2–3 meters. Watch for stumbles.
If calibration fails: - Check that the floor is truly level. - Ensure no objects are touching the robot. - Reboot and try again. If the problem persists, contact 1X support.
Defining Success: Minimum / Full / Advanced
| Tier | Definition |
|---|---|
| Minimum viable | Robot powers on, connects to the app, stands and responds to basic walk/sit commands |
| Full operational | Firmware updated, calibration passed, robot walks safely throughout your prepared space, app tele‑op reliable |
| Advanced | SDK/ROS2 access enabled, custom code or autonomous navigation running, integration with smart‑home systems |
Common Setup Mistakes & Fixes
| # | Mistake | Symptom | Fix |
|---|---|---|---|
| 1 | Skipping the support stand during first boot | Robot falls over, calibration fails | Always support the robot upright until calibration completes |
| 2 | Starting on thick carpet or uneven floor | Toppling or jerky walking | Use a 3 m × 3 m rigid mat; recalibrate if floor changes |
| 3 | Ignoring the “update now” prompt | App shows partial features; known bugs present | Update firmware immediately before first walk |
| 4 | Phone and robot on different WiFi bands | App cannot discover robot | Ensure both are on the same SSID (2.4 GHz or 5 GHz, not mixed) |
| 5 | Forgetting to charge battery after unboxing | Robot shuts off midway through calibration | Fully charge before any setup routine |
| 6 | Moving robot while calibration is running | Calibration error | Keep the robot stationary – no touching – until “passed” |
| 7 | Not marking exclusion zone | Bystanders walk too close during test | Tape off a 1 m ring; train everyone in the home |
| 8 | Attempting SDK commands without developer mode | SSH denied, no ROS topics | Enable developer mode in app settings; restart robot |
| 9 | Using a public/unsecured WiFi | Risk of unauthorized remote access | Use WPA2+ with strong password; consider IoT VLAN |
| 10 | Trying to walk on wet or oily floor | Slips, falls | Dry and clean the surface; test with a single slow step |
Comentarii