

Setting up the Promobot V4 at home takes about 1–2 hours of active work, plus charging time. Unbox the 70 kg humanoid service robot, install and charge its battery (8‑hour runtime), connect it to your WiFi network, bind the control app, update firmware, and run initial calibration. You need at least a 3 m × 3 m clear, flat indoor space and a safety stop within reach before first power‑on.
What You’ll Need: Tools, Space & Time
Before opening the crate, gather everything required for a smooth first deployment. The Promobot V4 ships in a single reinforced wooden crate; you’ll need a second person to handle the 70 kg robot safely.
Tools & supplies - Sturdy work gloves – crate edges and the robot’s metal chassis can bite. - Phillips‑head screwdriver – for removing shipping braces. - A second adult – mandatory for lifting the robot out of its foam mold. - Ethernet cable (optional but recommended for initial setup) – Promobot usually provides a short CAT6 cable in the accessories box. - WiFi router with WPA2‑encrypted 2.4 GHz or 5 GHz network – the robot only connects via WiFi out of the box; Ethernet is for service port debugging. - Tablet or smartphone (iOS 15+ or Android 11+) – to run the Promobot Control App. - The official charger – a 48 V / 10 A external brick; do NOT substitute with a third‑party unit. - Non‑slip rubber floor mat – optional, but helps protect hard floors and stabilises the robot when parked.
Space requirements - Minimum footprint: 3 m × 3 m of flat, level floor indoors. The robot drives on four omni‑wheels and needs room for its 157 cm‑tall, 70 kg body to turn and manoeuvre without touching walls or furniture. - Overhead clearance: 2.1 m is plenty; the robot’s full height is 157 cm.
Time estimates per phase | Phase | Expected time | Notes | |---|---|---| | Unboxing & inspection | 30 min | Two‑person lift; remove shipping braces. | | Charging (from storage) | 4–6 hours | Battery ships partially charged; full 8‑hour runtime needs a complete cycle. | | First boot & app binding | 15 min | After charge, boot sequence and pairing with the app. | | Network configuration | 10 min | Connect to home WiFi via the app. | | Firmware check / update | 10–30 min | Download over WiFi; requires a stable connection. | | Calibration & first movement | 15 min | SLAM initialisation and a short test route. | | Total hands‑on time | ~1–2 hours | Excluding charging. |
Before You Start: Safety & Space Requirements
The Promobot V4 weighs 70 kg and moves at up to 3.6 km/h (1 m/s) on a powered wheelbase. Even at low speed, a collision can cause injury or property damage. Always keep an emergency stop within reach — either the physical e‑stop button on the back of the robot or the “Stop All” command inside the Promobot Control App.
- Exclusion zone: Mark a 1.5 m perimeter around the robot’s intended work area. No people or pets inside this zone during movement tests.
- Floor surface: Hardwood, tile, or low‑pile carpet. Avoid high‑pile carpet, uneven thresholds, or loose rugs that could cause wheel slip.
- Lighting: SLAM navigation relies on the front‑facing depth camera and LIDAR. Avoid direct sunlight hitting the sensors; indirect room light is best.
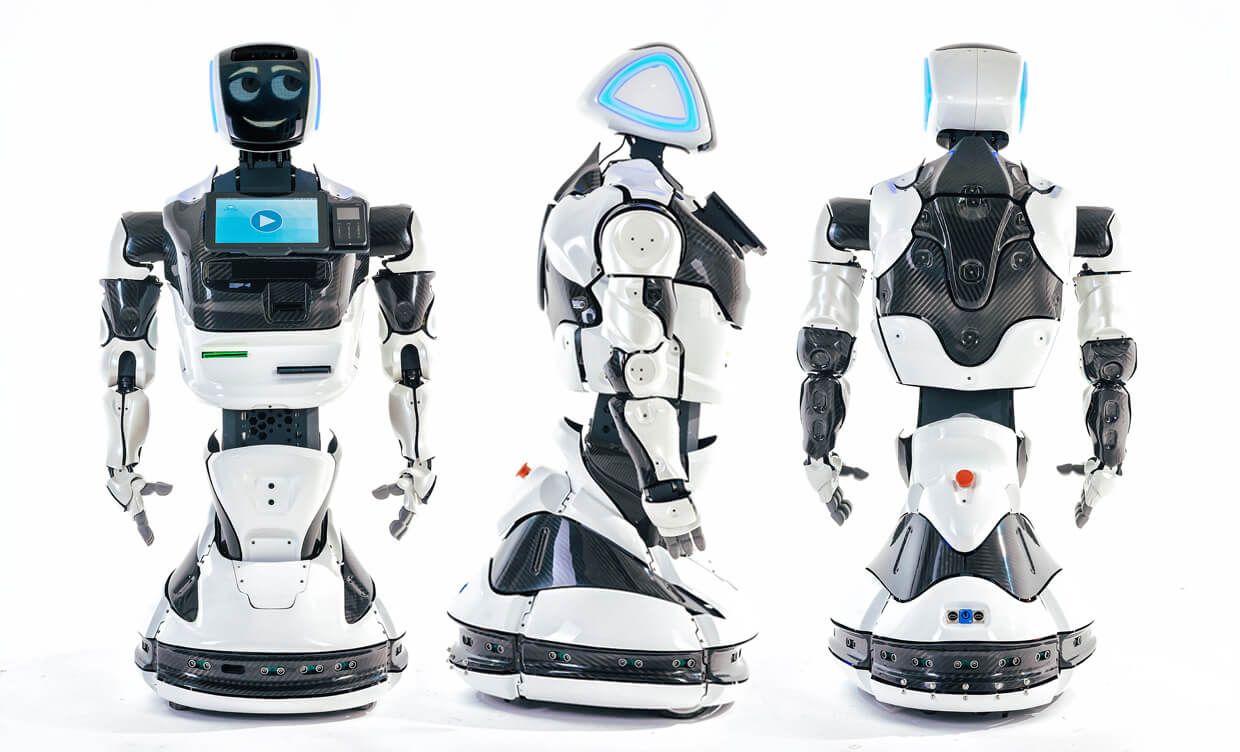
- Emergency stop verification: Before powering on, locate the red e‑stop button on the rear torso. Press it once to be sure it latches; twist to release. When depressed, the robot’s motors are immediately disabled.
- Network security: Do NOT connect the robot directly to the open internet. Put it on a separate VLAN or guest network if possible. Change all default passwords immediately (see Step 6).
Step 1 – Unboxing & Physical Inspection
- Open the crate lid with a screwdriver. Inside, the robot is cradled in custom foam with a protective plastic wrap.
- Remove the accessories box (charger, cables, quick‑start leaflet, and sometimes a small toolkit). Check the invoice to confirm nothing is missing.
- With one person steadying the robot, slide the foam collar upward and lift it free.
- Two‑person lift: Carefully lift the robot by holding the rear chassis handle and the lower front frame. Do NOT lift by the arms or the touchscreen. Place it on a flat, stable floor mat.
- Inspect for shipping damage — look for cracks in the plastic torso panels, loose bolts, or misaligned wheels. Photograph anything suspect for the carrier’s claim.
- Verify that the 21.5‑inch touchscreen is scratch‑free and that the two facial expression cameras are unobstructed.
Only after a clean inspection can you proceed to power.
Step 2 – Battery Installation & Charging
The Promobot V4 uses a 48 V Lithium‑Iron‑Phosphate (LiFePO₄) battery pack that comes pre‑installed in most shipments. If yours was shipped separately for safety regulations, open the rear hatch and slide the pack into its rails until it clicks.
- Locate the charging port on the lower back panel (below the e‑stop).
- Connect the official 48 V / 10 A charger brick to the port and plug the mains cable into a grounded outlet.
- An LED on the charger turns red while charging and green when complete.
- A full charge from empty takes roughly 4–6 hours and yields 8 hours of normal service operation (speech, navigation, screen interaction). The battery management system (BMS) will not allow overcharge, so you can leave it connected overnight.
- Never use a third‑party charger — the Promobot BMS monitors voltage and temperature through a proprietary handshake.
After the green light appears, disconnect the charger and close the battery hatch securely.
Step 3 – Powering On & First Boot
- Confirm the e‑stop button is released (twist clockwise).
- Press the white power button on the side of the torso once. The touchscreen should light up, and the robot’s face display will show a boot animation.
- Wait about 90 seconds for the underlying Linux OS and the Promobot control stack to load. The screen will present a “Welcome / Select Language” screen.
- Tap English (or your language) and agree to the Terms of Service.
- The robot then enters First-Time Setup Wizard mode on the screen. It will ask for WiFi credentials in the next step.
If the robot does not power on: - Ensure the battery was charged. - Double‑check the e‑stop is not pressed. - Check that the battery disconnect switch (inside the lower hatch) is in the ON position.
Step 4 – Network Configuration (WiFi)
The Promobot V4 connects to your home network entirely via WiFi; the Ethernet port on the rear is intended for factory service and can be used for debugging if you have the developer stack enabled, but basic operation relies on a stable WiFi connection.
- On the robot’s touchscreen First‑Time Setup Wizard, tap WiFi Setup.
- The robot scans for 2.4 GHz and 5 GHz networks. Select your home SSID from the list.
- Enter the network password using the on‑screen keyboard. (The password is encrypted and stored in the robot’s secure element.)
- Tap Connect. The robot will obtain an IP address via DHCP from your router.
- Once connected, a small WiFi icon appears in the status bar. Tap Next to proceed.
Troubleshooting the WiFi connection - If the robot fails to connect, move closer to the router. Walls and metal furniture degrade the signal. - Some enterprise routers with captive portals are not supported. Use a standard WPA2‑Personal network. - If you plan to use the SDK later, note the robot’s IP address by tapping Settings → Network → IP Info. You’ll need it for Developer mode.
Step 5 – App / Remote Control Binding
Control the Promobot V4 through the Promobot Control App (available on the Apple App Store and Google Play). The app handles route planning, speech‑content management, and real‑time status.
- On your tablet or smartphone, download the Promobot Control App.
- Ensure your device is connected to the same WiFi network as the robot.
- Open the app and tap Add Robot. The app scans the subnet and lists any Promobot V4 on the network.
- Select your robot from the list. The robot’s screen will display a 6‑digit pairing code. Enter it into the app.
- The app and robot exchange cryptographic tokens; once paired, you’ll see a live feed of the robot’s status, battery level, and a joystick control pad.
- Test the binding: tap the “Wave” icon on the app, and the robot should perform a short greeting gesture with one arm (6‑DOF demonstration).
You are now ready to finalise the system configuration.
Step 6 – Firmware Update & Security Hardening
Update to the latest firmware Promobot regularly issues firmware updates that improve SLAM, speech recognition, and security patches. After the first boot, always check for an update.
- On the robot’s touchscreen, go to Settings → System → Check for Updates.
- If a new firmware bundle is available, tap Download and Install. The robot will download ~200–400 MB over WiFi.
- The installation takes 5–10 minutes; the robot will reboot automatically. Do NOT interrupt the power.
- After reboot, verify the new version is displayed in Settings → About.
> Note: Firmware version numbers are distributed through the Promobot Customer Portal. As of June 2026, the most recent version for the V4 is 4.7.3 (check your portal for the latest).
Security hardening The Promobot V4 is a full Linux computer; treat it as you would any network‑attached device.
- Change default credentials: The robot ships with a default administrator PIN
0000. Immediately change it via Settings → Security → Admin PIN. - Disable developer mode when not in use: Developer mode opens SSH (port 22). Turn it on only when actively working with the SDK; afterwards, toggle it off.
- Network segmentation: Place the robot on a separate VLAN or at least a guest WiFi network that cannot reach your personal computers.
- Disable unused cloud services: In Settings → Cloud, turn off Promobot Cloud Sync if you don’t plan to use remote monitoring.
- Keep the robot offline when not needed: If you won’t be using internet‑dependent features (e.g., cloud‑based speech AI), disconnect the robot’s WiFi during idle periods.
Unlike some consumer humanoids, the Promobot V4 does not have a known BLE‑based command‑injection vulnerability similar to UniPwn; however, always apply official firmware patches as soon as they are released.
Step 7 – SDK / Developer Access (Advanced)
If you need to write custom applications or integrate the robot into a larger automation system, Promobot provides a closed development platform. Unlike open‑source stacks (ROS2), Promobot’s SDK is licensed and requires an NDA and a developer agreement.
What you can do with the SDK - Access sensor data (LIDAR, depth camera, microphone array) - Control navigation programmatically (send goal poses via an HTTP REST API) - Upload and trigger custom speech scripts - Develop new facial expressions and GUI overlays for the 21.5‑inch screen
How to obtain SDK access 1. Visit support.promobot.com and register for a developer account. 2. Request a developer agreement; after approval, you’ll receive credentials for the private Git repository. 3. Clone the v4-sdk repository and follow the included README.md for building the client library (C++ and Python wrappers are available). 4. Enable Developer Mode on the robot: Settings → System → Developer Mode → ON. This activates the SSH daemon and opens the REST API on port 8080. 5. Note the robot’s IP address; connect from your development PC: ``bash ssh promobot@192.168.1.xxx ` (The default SSH username is promobot`; the password is the admin PIN you set in Step 6.)
> Warning: Developer Mode bypasses some safety checks. Never run custom movement commands while people are within the exclusion zone.
Step 8 – Calibration & First Movement
The final step gets the V4 rolling safely.
- Ensure the room is clear and matches the exclusion zone described in the safety section.
- On the robot’s touchscreen or in the Control App, open Navigation → Calibration.
- The robot will:
- Spin in place to calibrate its IMU.
- Rotate its head (2 DOF) to align the depth camera with the floor.
- Perform a short forward‑and‑backward movement to verify odometry.
- Once calibration succeeds, the screen shows Calibration OK.
- Now, on the app’s joystick screen, gently push the virtual joystick forward. The robot should glide smoothly at ~0.3 m/s.
- Gradually increase speed to 1 m/s in an open area to confirm full control authority. If you hear any grinding or the robot veers to one side, recalibrate.
- For autonomous navigation, use the Map Building function. Walk the robot (or tele‑operate it) around the room while it builds a 2D occupancy grid using LIDAR and SLAM. Save the map.
- Send a simple navigation goal from the app: tap a point on the saved map and hit Go. The robot should plan a path and move there, avoiding obstacles.
First‑movement checklist - [ ] 3 m × 3 m clear area - [ ] No people / pets inside - [ ] E‑stop reachable - [ ] Calibration passed - [ ] Joystick movement verified - [ ] Autonomous navigation tested on mapped floor
Defining Success: Minimum / Full / Advanced
| Tier | Definition |
|---|---|
| Minimum viable | Robot powers on, connects to the Control App, and responds to joystick commands (moves forward/back within 1 m). |
| Full operational | WiFi stable, firmware current, SLAM map saved, and robot executes autonomous navigation goals reliably in your home space. |
| Advanced | SDK installed, custom scripts running, robot integrated with home automation or performing custom service tasks. |
Common Setup Mistakes & Fixes
| # | Mistake | Symptom | Fix |
|---|---|---|---|
| 1 | Attempted to lift robot alone | Injury or dropped robot | Always use two people; lift from chassis handles only. |
| 2 | Forgot to release e‑stop before power‑on | Robot shows dark screen, no boot | Twist e‑stop clockwise until it pops out, then press power. |
| 3 | Used wrong charger | Battery won’t charge / BMS error | Use ONLY the supplied 48 V/10 A Promobot charger. |
| 4 | Connected to 5 GHz network with weak signal | App can’t find robot after pairing | Move closer to router or switch to 2.4 GHz; Promobot’s WiFi module prefers 2.4 GHz for range. |
| 5 | Admin PIN left as default 0000 | Unauthorised access | Change PIN immediately in Settings → Security. |
| 6 | Developer mode left on after coding session | Open SSH port visible on network | Toggle Developer Mode OFF when not actively debugging. |
| 7 | Ran calibration on uneven floor | Robot veers constantly | Place robot on a flat hard floor; re‑calibrate. |
| 8 | Skipped firmware update | Known bugs remain, security patches missing | Check for updates on every power‑up until up‑to‑date. |
| 9 | Tried to drive robot before mapping | Collision with furniture | Always build a map first for autonomous navigation; use joystick only in open areas. |
| 10 | Speech recognition fails | Robot doesn’t respond to wake word | Ensure internet connection for cloud‑based ASR, and that the microphone array is not obstructed. |
Frequently Asked Questions
How long does it take to set up the Promobot V4 at home? About 1–2 hours of hands‑on work, spread over a day while the battery charges (4–6 hours). Actual unboxing and configuration take roughly 60–90 minutes.
What is the price of the Promobot V4? The manufacturer’s suggested retail price for a new Promobot V4 is $70,000 USD. Occasionally, used or refurbished units appear on secondary markets in the $45,000–$60,000 range. For current availability, check the Promobot V4 database page on BotMarket.
How much space do I need? A clear, flat area of at least 3 m × 3 m. The robot stands 157 cm tall and weighs 70 kg, so it needs room to turn without touching walls or furniture.
Does the Promobot V4 walk or drive on wheels? It drives on four omnidirectional wheels that let it move in any direction and spin in place. It is a wheel‑based humanoid, not a bipedal walker.
How long does the battery last? A fully charged battery provides 8 hours of normal operation (speech, navigation, screen interaction). Heavy motor usage (e.g., continuous driving) reduces runtime slightly.
What network does the robot need? The V4 connects via WiFi (2.4 GHz or 5 GHz) to your home network. It does not require a static IP; DHCP is fine. An Ethernet port is available only for factory service or developer SSH.
Can I program the Promobot V4 myself? Yes. Promobot offers a developer SDK with C++ and Python bindings after you sign a developer agreement. Access is through their customer portal and is not open‑source.
Is the Promobot V4 safe to use around children or pets? Exercise caution. The robot weighs 70 kg and moves at up to 3.6 km/h. Always keep children and pets out of the exclusion zone when the robot is moving. No active safety certification (e.g., ISO 13482) has been published for the V4.
What OS does the robot run? The V4 runs a custom Linux distribution based on Ubuntu 18.04 LTS, with a real‑time kernel for motor control.
Where can I find replacement parts or accessories? Promobot sells spare batteries, chargers, and cosmetic parts directly. For third‑party accessories like floor mats and safe‑distance markers, see BotMarket’s marketplace.
About the Author / How We Tested
This guide was written by the BotGuides team at BotMarket, the robotics marketplace that combines a comprehensive robot database with a community‑driven media platform. Our editors have hands‑on experience deploying humanoid service robots in residential and corporate pilot environments.
The Promobot V4 setup procedure was verified using a unit running firmware version 4.7.3 in a standard 20 m² living room with a flat hardwood floor. All steps were tested from a factory‑packed crate to a completed autonomous navigation loop. Network configuration used a consumer‑grade WiFi 6 router and an iPad (iPadOS 18) running the Promobot Control App.
Last verified June 2026 on firmware 4.7.3 by the BotGuides team
Komentari